Please keep in mind that I'm writing these instructions out with the assumption that the reader already knows how to make bracelets with some proficiency. If you're a beginner, please visit one of the sites above to learn the basics!
I'm also not making any promises that my instructions are 100% accurate. I may have made mistakes/confusing bits when I wrote these down... Again, these designs are for people who know what they're doing at least as much as I do. ;)
Please check back occasionally, I plan on adding more designs soon. :)
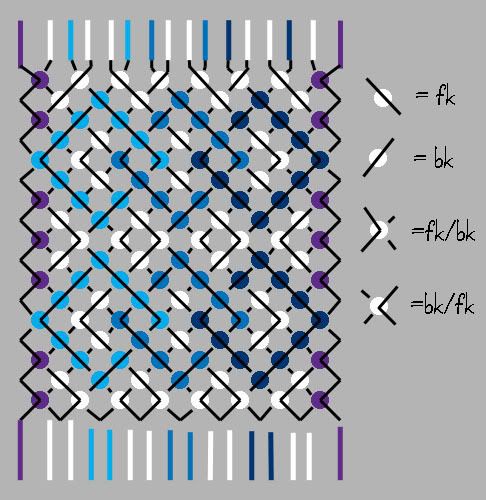
This bracelet has so many steps that I thought it was more practical to draw a diagram than to write it up. :)
Just follow the lines on the pattern at right. Each dot represents a knot, the colored lines at the top show the starting positions for each thread, and the black lines show you the direction of travel for every thread!
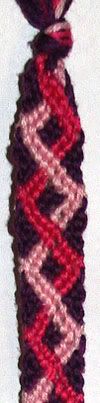
Made with 3 different colours arranged:
1212 1111 3131
Each thread should be about 75" and folded in half. Basically, from your fingertips to the top of your head (or higher, depending on how long you want the bracelet to be) and back. I always use WAY more thread than I actually need, just so I don't run out.
-fk = forward-traveling knot
-bk = backward-traveling knot
-fk/bk = a knot where the thread ends up in the same position where it started.
1. Make a fk/bk knot with the 6th thread from the left.
2. Make 3 bk with the 4th thread on the right.
3. Make 1 fk/bk and 3 bk with the 2nd thread on the right.
4. Make a triangle by making 3 bk with the 1st thread on the right, then 1 bk/fk with the new 1st thread, then 2 fk with the original 1st thread.
5. Make 7 fk and 1 fk/bkwith the 4th thread on the left.
6. Make 1 bk/fk, 7 fk and 1 fk/bk with the 2nd thread on the left.
7. Make a triangle on the left side, as on the right.
8. Make 3 bk and 1 bk/fk with the 5th (I think) thread on the left.
9. Make 2 bk and 1 bk/fk with the 6th thread on the left.
10. Make a little diamond as follows:
Make 1 fk/bk with the 6th thread, then 1 bk/fk with the 6th thread, 1 fk/bk
with the 7th thread, then another fk/bk with the 6th around the 7th.
11. repeat from step 2 (approx) for pattern.
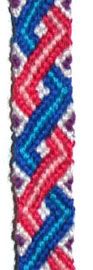
Made with 6 colors (14 threads) arranged:
1 222 354635 222 1
Threads should be folded in half (except for colors 4 and 6, which are single) and should all be arm-to-over-the head-length. This is a pretty wide bracelet, and you don't want to run out. :)
1. Starting on the left, make 1 fk/bk with the 1st, 3rd, 5th, 7th and 9th threads.
2. Make bk/fk with the 1st and 3rd threads on the RIGHT.
3. Make 2 bk with the 3rd thread on the left.
4. Make 4 bk with the 5th thread on the left.
5. Make 4 bk and 1 bk/fk with the 7th thread on the left.
6. Make 4 bk and 1 bk/fk with the 9th thread on the left.
7. Make 2 fk with the 3rd thread on the RIGHT.
8. Make 4 fk with the 5th thread on the right.
9. Make 3 fk and 1 fk/bk with the 6th thread on the right.
10. Make 2 fk and 1 fk/bk with the 7th thread on the right.
11. Make a diamond in the middle:
1 fk/bk with the 7th thread on the left, 1 bk/fk with the 7th thread on the left,
1 fk/bk with the 8th thread on the left, and 1 fk/bk with the 7th thread again.
12. Make 2 fk with the 5th thread on the left.
13. Make 3 fk with the 3rd thread on the left.
14. Make 4 fk with the 1st thread on the lef.t.
15. Make a triangle on the left:
With the new 1st thread, make 2 fk and 1 fk/bk.
With the new 1st thread make 1 fk/bk.
With the 3rd thread, make 2 bk.
16. Make 9 bk with the 5th thread on the RIGHT.
17. Make 9 bk and 1 bk/fk with the 3rd thread on the right.
18. Make 9 bk and 1 bk/fk with the 1st thread on the right.
19. Make a triangle on the right.
20. Continue from STEP 8 for pattern.
This is a complex design, but not too difficult to make.
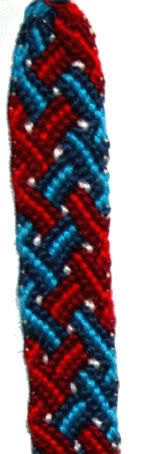
Made with 3 colors (12 threads) arranged as follows (purple=1 blue=2 black=3):
1 3333 1 2 3333 2
(threads should be about 70" long)
I made this one with threads folded in half; a loop at the top and 2 tie strings at the end.
1. Start by making the top row: 1 fk with the 1st thread, 1 fk/bk with the 3rd, 1 bk with the 6th, 1 fk with the 7th, 1 fk/bk with the 9th, 1 bk with the 12th.
2. Make 1 fk with the 2nd thread, 1 bk with the 5th thread, and then 1 fk/bk with the new 3rd (which used to be the 2nd) around the new 4th thread.
3. Repeat step 2 with the 8th and 11th threads.
4. Make 1 fk/bk with the 1st thread, and 1 bk/fk with the 12th thread.
5. Make 2 bk with the 3rd thread and 2 fk with the 10th.
6. Make a diamond in the middle: 1 fk/bk with the 6th thread, 1 fk/bk with the 7th thread, 1 bk/fk with the 6th thread, and 1 bk/fk with the 7th thread.
7. Make 2 bk with the 9th thread.
8. Make a diamond on the RIGHT side just like in the middle, with the 4 threads that are the same color.
9. Make 2 bk with the 12th thread, and 1 bk/fk with the new 12th thread
10. Make 5 fk with the 4th thread.
11. Make 1 bk with the 10th thread.
12. Make 2 more fk with the new 10th thread (this is the one that just made the 5 fk).
13. Now make a diamond on the LEFT.
14. Make 2 fk with the 1st thread, then 1 fk/bk with the new 1st thread.
15. Make 5 bk with the 6th thread.
16. Make a diamond in the MIDDLE.
17. Repeat from step 7 for pattern. Be sure to watch which threads are "crossing" over in the x's if you want to achieve the over-under mesh pattern. : )
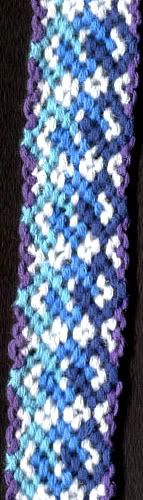
Made with 5 colors (plus blind threads) for a total of 16 threads.
Arranged as follows (light blue=1 dk.blue=2 white=3 red=4 dk.red=5 blind=6)
1 6 22 5 2 4 1 3 2 4 5 44 6 3
Threads should be 70-75" long and folded in half.
Start by making the first couple of rows straight across:
1. Row 1: 1 fk with the 1st thread , 1 fk with 3rd, 1 bk with 6th, 1 bk with 8th, 1 bk with 10th, 1 fk with 11th, 1 bk with 14th, 1 bk with 16th.
2. Row 2 : 1 fk with the (new) 2nd thread, 1 fk with 4th, 1 bk with 7th, 1 bk with 9th, 1 fk with 10th, 1 fk with 12th, 1 bk with 15th.
3. Row 3: Make 1 bk/fk with 2nd thread, 1 fk with 3rd, 1 fk with 5th, 1 bk with 8th, 1 fk with 9th, 1 fk with 11th, 1 fk with 13th, and 1 fk/bk with the 15th thread.
4. Make 1 fk/bk with the 8th thread (in my pattern this makes a white dot.)
5. Make 2 fk with the 6th thread, 3 fk with the 4th thread, and 4 fk with the 2nd thread.
6. Make 1 fk and 1 fk/bk with the 14th thread, 4 fk with the 12th thread, and 4 fk and 1 fk/bk with the 10th thread.
7. Make 1 bk/fk with the 2nd thread, 2 bk with the 3rd thread, 1 bk and 1 bk/fk with the 4th thread, and 1 bk/fk with the 5th (white) thread. THEN make 1 fk with the 3rd thread, 2 fk with the 1st thread, and 1 bk/fk with the 2nd thread.
8. Make 5 bk with the 10th thread, 5 bk with the 11th thread, and 5 bk with the 12th thread.
9. Make 1 fk/bk with the 12th (white) thread.
10. Make 1 bk with the 14th thread, 2 bk with the 16th thread, and 1 fk/bk with the 15th thread.
11. Make 4 fk and 1 fk/bk with the 10th thread, 6 fk with the new 10th thread, then make 5 fk and 1 fk/bk with the 9th thread.
12. Make 1 fk/bk with the 8th (white thread).
13. Make 4 fk with the 4th, 3rd, and 2nd, threads.
14. Repeat from STEP 7 for pattern.
 This bracelet has so many steps that I thought it was more practical to draw a diagram than to write it up. :)